Thursday 16 July 2015

Birthday Boy


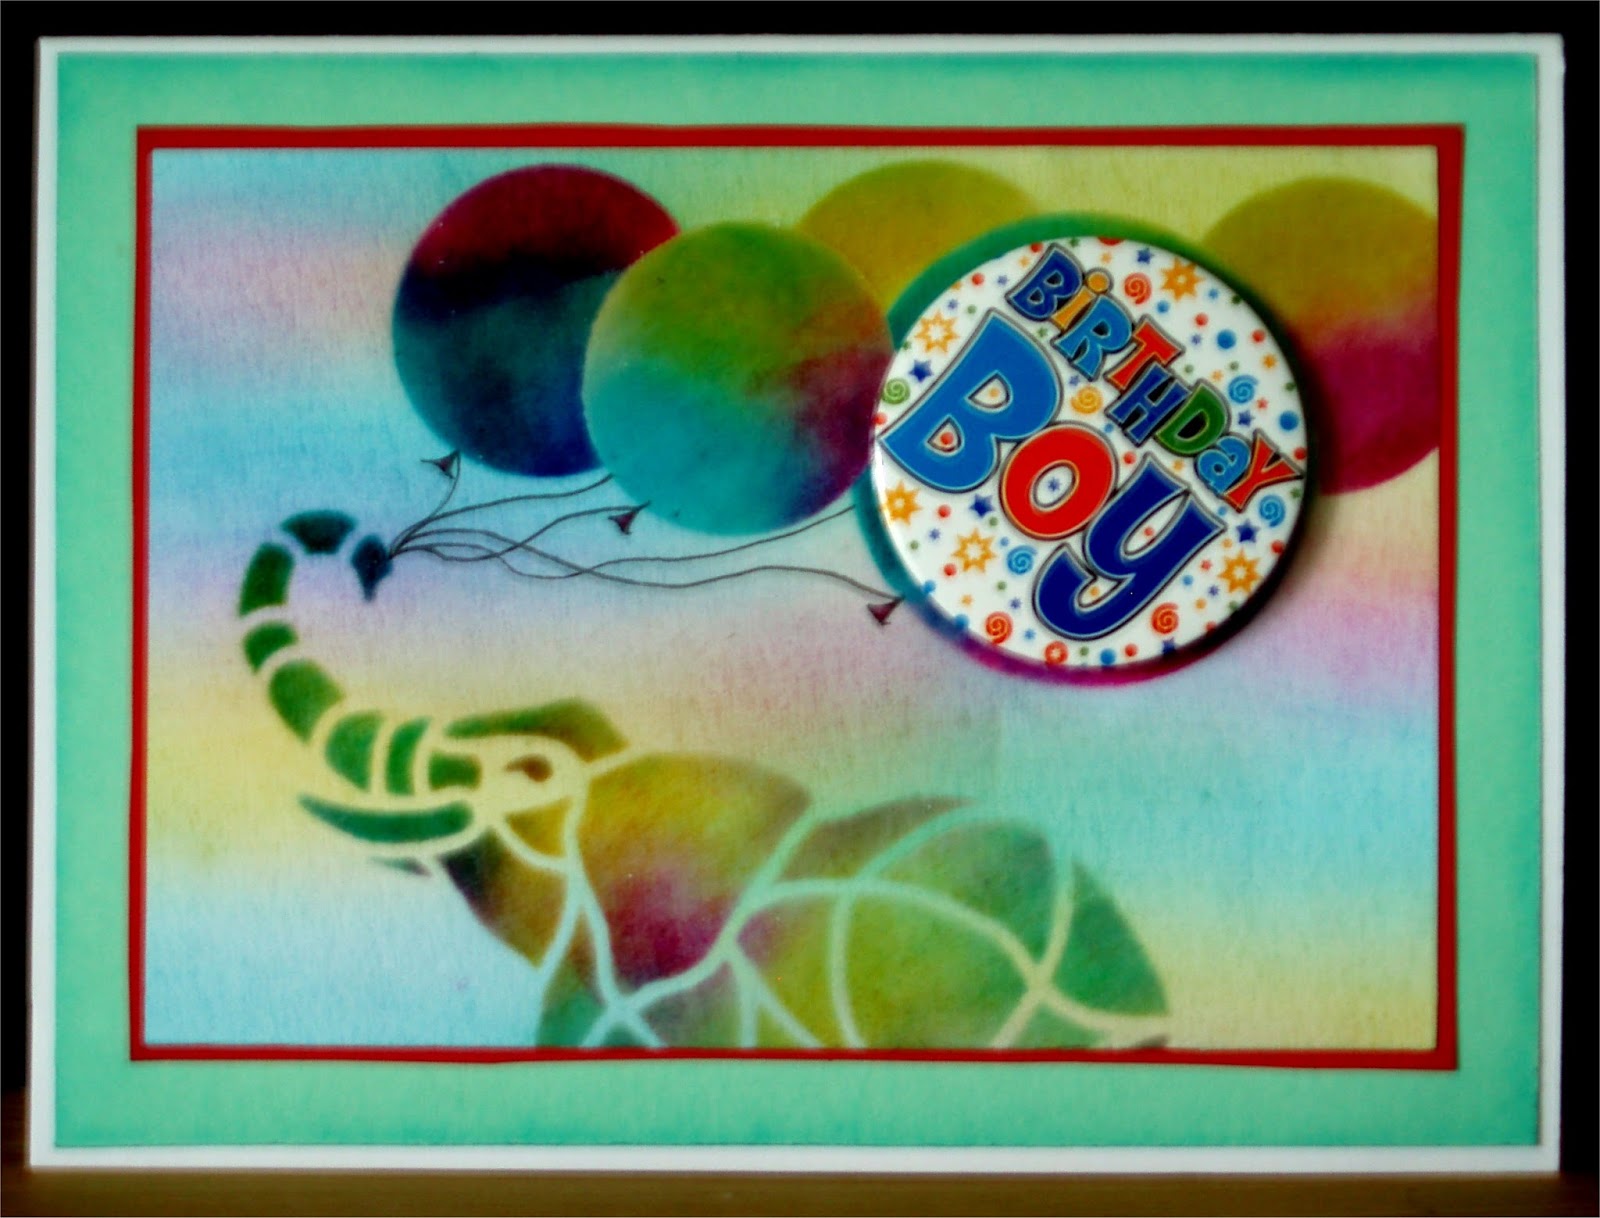
Playing around with this month's NDSC Claritystamp stencil I thought it would make a simple card for my grandson's birthday.  I don't have many stamps/stencils that suit a children's card but I think this one works quite well.  

Stamps:     Claritystamp Happy Birthday, Hobbycraft Floral Numbers (both inside card) 
Stencils:    Claritystamp NDSC 14 Elephant
Inks:          Adirondack Butterscotch, Stream, Raspberry, Jet black Archival, VersaMark Watermark 
Other:        Stencil brushes, Heat-It-Up clear embossing powder, black pen, Birthday badge


  • For the background lightly brush on a mixture of three bright coloured inks.
  • Tape stencil to card and using the same colours add darker colour to the elephant with sponges.  Wipe excess ink from the stencil then dab the Versamark ink pad through the stencil.  Remove stencil and heat emboss with clear powder. 
  • For the balloons make two circle stencils. (I used my Bigshot and some circle dies) Using same method as the elephant add colours and heat emboss balloons one at a time.  Notice my mistake?
  • Add strings to the balloons with black pen.
  • Inside card (not shown) stamp Happy 2nd Birthday.  I have cut my 'Happy Birthday' stamp into two separate words to make it more versatile. 
  • Stick on badge with pads.  Because the balloons are embossed it doesn't mark them when the badge is taken off.
Did you spot the mistake? My large balloon which is supposed to be at the front goes behind a smaller one. Start with the large balloon to avoid this.  I don't think my grandson will notice, he is only two.

Lesley x


Sunday 12 July 2015

Art Class - Final Piece

Arum Lilies on Green/Acrylic
This is my final piece for this term's Art Class which was influenced by the flower paintings of Georgia O'Keeffe and Tamara de Lempicka.  We have these beautiful Arum Lilies growing around our pond and it was easy to choose them as my subject.  I wanted a more subtle background compared to my red/pink practice painting and opted for pale greens.  The leaves are supposed to be more of a pattern than real leaves.  I dry brushed on some red towards the end as the painting had become too green.  I prefer this painting, the composition is better, but the jury is out as several of my colleagues at the Art class and my husband, Jeremy, liked the red version better.  If you have an opinion please let me know. 

No more classes until September, but I hope to keep practising over the summer so do pop in.

Lesley x

Wednesday 8 July 2015

Art Class - Arum Lilies


A zoom in on some Arum Lilies in the style of Georgia O'Keeffe/Tamara de Lempicka.   I was aiming for a simplistic style and not realism. This is a practice piece before I do my final painting for the end of term. I have used white wax crayon as a resist on the flowers and then gone over with very diluted Acrylic paint like watercolour, gradually building up the colour. The green is more vivid than the photograph shows.  The background took me longer than the flowers as I changed it's colour several times before I was happy with it. 

Lesley x

Wednesday 1 July 2015

Claritystamp Challenge - Anything goes


With a free choice this month in the Claritystamp Challenge I thought I would use a couple of sets of stamps I had bought recently but not actually used yet. I had several attempts at this one until I came up with a design I liked.  Unfortunately I was so wrapped up in doing it I forget to take the photos for a step-by-step so hope my instructions are not too long-winded. The method was inspired by Barbara's Fabric Fields NDC 100 so if you are in the New Design Club look back at her instructions, she has photos.

Stamps:      Hares and trees from 'In the Country' set, Filigraphy Foliage set, Laurel hedge 
Inks:           Adirondack Butterscotch and Lettuce, Ranger Archival Jet Black
Other:         Theuva Card, Stencil brushes, , Felt pens, Spectrum Noir pencils, Sharpie black pen


  1. Stamp the hares in archival ink onto Theuva card, cover with the mask that comes with the set.
  2. Cover all but bottom section with a copier paper mask and brush lightly with Lettuce ink then stamp the trees using the mask that comes with the set as you move along.
  3. Move onto next section leaving a white gap.  This one was brushed with Butterscotch and stamped randomly with leaves from the Filigraphy set.
  4. Moving up again brush with Lettuce and stamp with Laurel hedge.
  5. Finally the top section is brushed with Butterscotch and stamped with the trees again.
  6. Remove mask from the hares. I used fine felt pens to colour in the sections but pencils would be just as good.  If you want to use alcohol pens to colour in don't use Archival ink when you are stamping. Add shading to the hares with Spectrum Noir colouring pencils.
  7. Barbara adds some Zentangle to the white strips in her example but I quite liked it with the white so just left them.
  8. Edge with a black Sharpie pen then mount on white then silver/grey card.
  9. Brush a piece of white card with Lettuce and stamp the Laurel hedge around the edges. Colour in as before and use as final mount.
My aim was a Zentangle look without having to draw the the shapes myself.  The colouring-in took a while but it is so relaxing it is time well spent.

Lesley x