Tuesday, 1 September 2015

Claritystamp Challenge - Shaped Card


Another month has flashed by and it's time for another Claritystamp Challenge. This month the challenge is to make a shaped card, no squares or rectangles. I was determined not to leave it to the last minute this month, and maybe because I still had last month's design in my head, this one has turned out very similar. Next month I promise I will do something totally different.

Stamps:  Claritystamp Character Silhouette set, Douglas and Lily, Words from the Birdcage set, NDC82 Cherries
Dies:       Tim Holtz On the edge Distressed Doily, Sizzix Thinlets Decorative trim #2
Inks:       Adirondack Stream and Denim, Black Archival
Other:     A4 pearly cardstock, Blue card, Blue Watercolour marker

  • Using the Doily Die cut the top front of the card. Fold the card in half and cut the back with scissors freehand slightly higher than the cut out doily. (If I was doing this again I wouldn't cut the back until later.)
  • Cut an oval from some background card previously created with shaving foam.  I used a template and cut round by hand but if I had one an oval die would have been much more accurate.  Stamp on the couple using Archival black ink and then add some shading around the edges and under their feet with a mixture of Stream and Denim ink.


  • Sorry forgot to take photos of the next few stages.
  • Mount the oval on blue card and cut around then stick to the front of the card. I had intended to have a wider blue edge but cutting by hand it got smaller and smaller. I must get some Oval dies. 
  • Decided it needed some blue card inside the card so stuck this in and then cut around the shape again. (This is where it would have been easier to cut the two back pieces at the same time.)
  • Stamp the words on another piece of the Shaving foam paper, mount on blue card and stick below the oval.

  • Finishing touches.  Make some little flowers using the NDC Cherries stamp.
  • Stamp onto scraps of shaving foam card, Go around the edges with blue watercolour marker, brush on a little water and then blot with kitchen roll, cut out. I made 9.

  • Attach 5 flowers to top, slightly shaping them, and 3 in a line inside the card (not shown). The last one might go on the envelope.
  • Draw faux blue stitching around the oval and word strip using the fine end of the blue watercolour marker.
  • Cut out two paper trims using decorative trim die and add to top and bottom of word strip.

Hope this has been some inspiration for you to have a go at this month's Claritystamp challenge.  I will use my card for an upcoming family wedding in October.  I am pretty sure my nephew doesn't read craft blogs.  Looking forward to seeing all your entries.

Lesley

Thursday, 27 August 2015

Flower Painting course

Hydrangea
For two and a half days back at the end of July I attended a Flower Painting course at Wensum Lodge, Norwich.  I haven't done any other painting during the summer unless you count decorating the house so thought you might like to see my efforts from the course.


The course tutor was Toni Hayden who was brilliant and very inspiring.  Her sketchbooks and paintings that she brought in to show us were fantastic and it would take me years of practice to get anywhere near the standard of her work.  There were about ten of us on the course and an abundant array of flowers and fruit in the centre of the studio which we could select to paint.  Toni demonstrated and also came round and gave us individual help and advice.


The medium for these paintings was Gouache, something I have only tried a few times before, and watercolour paper. Everything was painted with one brush which Toni recommended, Da Vinci - Maestro No.6.  An investment as it cost more than I usually spend on a whole set of brushes. Certainly won't be letting the grandsons borrow that one!


Add caption

 This may not look much for half a weeks work but it took a lot of concentration. I thoroughly enjoyed the class and if you like flower paintings check out some of Toni's work.

Lesley x

Saturday, 1 August 2015

Claritystamp Challenge - Bingo

Flowers/Stamp/Glitter
This month's theme has definitely been a challenge for me.  I have experimented with loads of different techniques and my rubbish bin has been overflowing but as the deadline quickly approached I decided in the end to keep it simple.

Stamps:    Claritystamp NDC Alice, NDC Round Tree, Leafy Swirl
Inks:          Adirondack Stream, Archival Black, Versamark
Other:       Claritystamp Theuva card, Sizzix Die Flourish #2, Button Die, Perfect Pearls,   Glitter, Sticky labels

  • Die cut some flowers and brush the edges lightly with some Stream ink. 
  • Stamp randomly with the NDC Round Tree, 1st, 2nd and 3rd generation ink.  

  • Stick the flowers together to make 1 flower, I used 2 large and 1 small flower with a die-cut button for the centre. (Sorry, I don't know the make of the button die.) Set aside to dry.
  • Stamp Alice twice onto sticky labels with Archival black. 
  • On the 1st Alice, stamp the Round Tree over her dress, this time with Versamark ink.  Dust with white Perfect Pearls.
  • On the 2nd Alice, colour in her face, hair and body with colour pencils


  • Carefully cut out the dress only on the first Alice and the whole image on the 2nd Alice.
  • Remove the dress from the backing and stick on top of the whole image.
  • Using a mask, I used a die-cut circle, brush Stream ink over the aperture, making it darker at the edges.  Sponge a little bit of ink where you think Alice's shadow will be.
  • Stick Alice in position.


  • With Archival black ink, stamp the Leafy Swirl twice.

    • Cut the card into a square and using left over ink on the brush, lightly colour the edges.
    • Mount on Blue card, and then a square card blank.
    • Attach flower to corner.
    • Let's check the Bingo card.  Flowers, Stamp, Perfect Pearls, Dies. Some Glitter needed to make a diagonal line (and a horizantal one)
    • Add glitter to the Leafy Swirls and centre of the flower and BINGO.
    • There is room to add a greeting at the top but I will leave that until I know who it is going to


    Phew! Just made the deadline.  Now all I need to do is put away the Shrink Plastic, Stencils, Stamps, Grunge Paste, Perfect Pearls, Dies, Glitter etc etc.  It has been a good challenge as it has made me look again at things and techniques I have not used in a while, even if they didn't get used in my final card.  

    Looking forward to seeing all your entries.

    Lesley x


    Thursday, 16 July 2015

    Birthday Boy


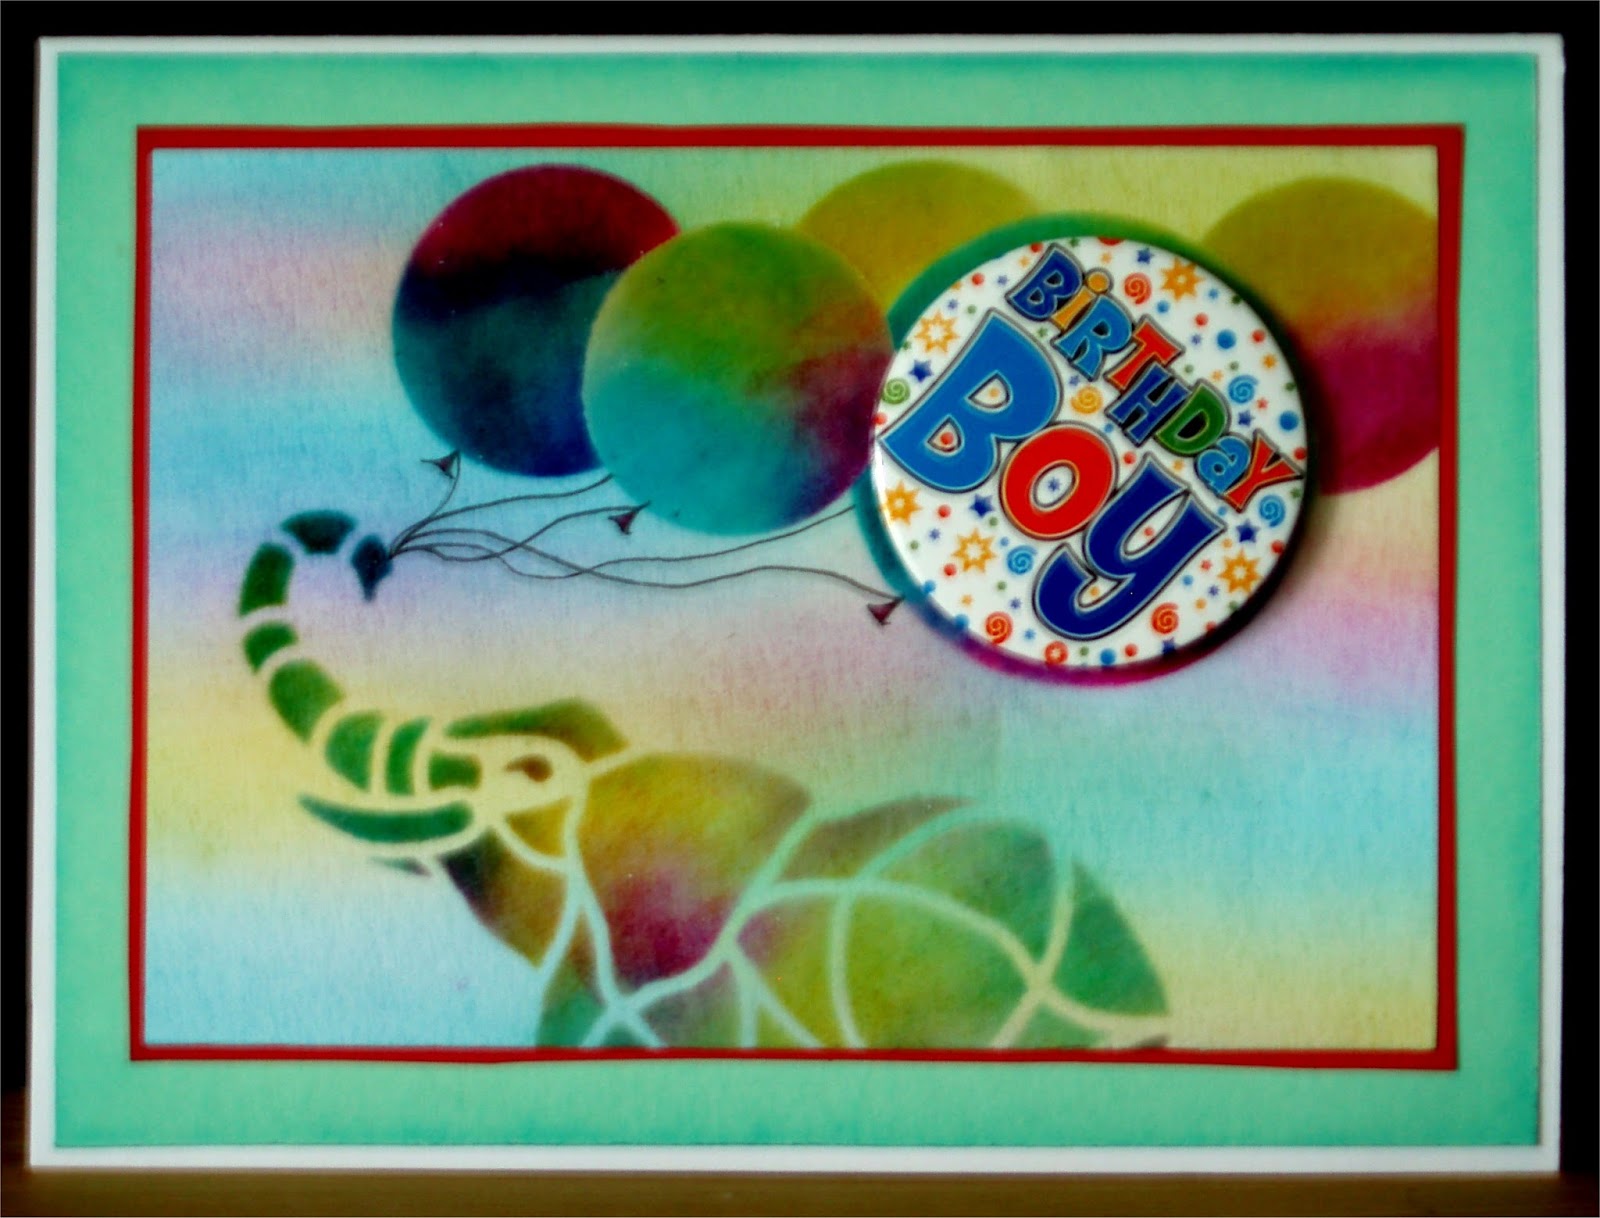
    Playing around with this month's NDSC Claritystamp stencil I thought it would make a simple card for my grandson's birthday.  I don't have many stamps/stencils that suit a children's card but I think this one works quite well.  

    Stamps:     Claritystamp Happy Birthday, Hobbycraft Floral Numbers (both inside card) 
    Stencils:    Claritystamp NDSC 14 Elephant
    Inks:          Adirondack Butterscotch, Stream, Raspberry, Jet black Archival, VersaMark Watermark 
    Other:        Stencil brushes, Heat-It-Up clear embossing powder, black pen, Birthday badge


    • For the background lightly brush on a mixture of three bright coloured inks.
    • Tape stencil to card and using the same colours add darker colour to the elephant with sponges.  Wipe excess ink from the stencil then dab the Versamark ink pad through the stencil.  Remove stencil and heat emboss with clear powder. 
    • For the balloons make two circle stencils. (I used my Bigshot and some circle dies) Using same method as the elephant add colours and heat emboss balloons one at a time.  Notice my mistake?
    • Add strings to the balloons with black pen.
    • Inside card (not shown) stamp Happy 2nd Birthday.  I have cut my 'Happy Birthday' stamp into two separate words to make it more versatile. 
    • Stick on badge with pads.  Because the balloons are embossed it doesn't mark them when the badge is taken off.
    Did you spot the mistake? My large balloon which is supposed to be at the front goes behind a smaller one. Start with the large balloon to avoid this.  I don't think my grandson will notice, he is only two.

    Lesley x


    Sunday, 12 July 2015

    Art Class - Final Piece

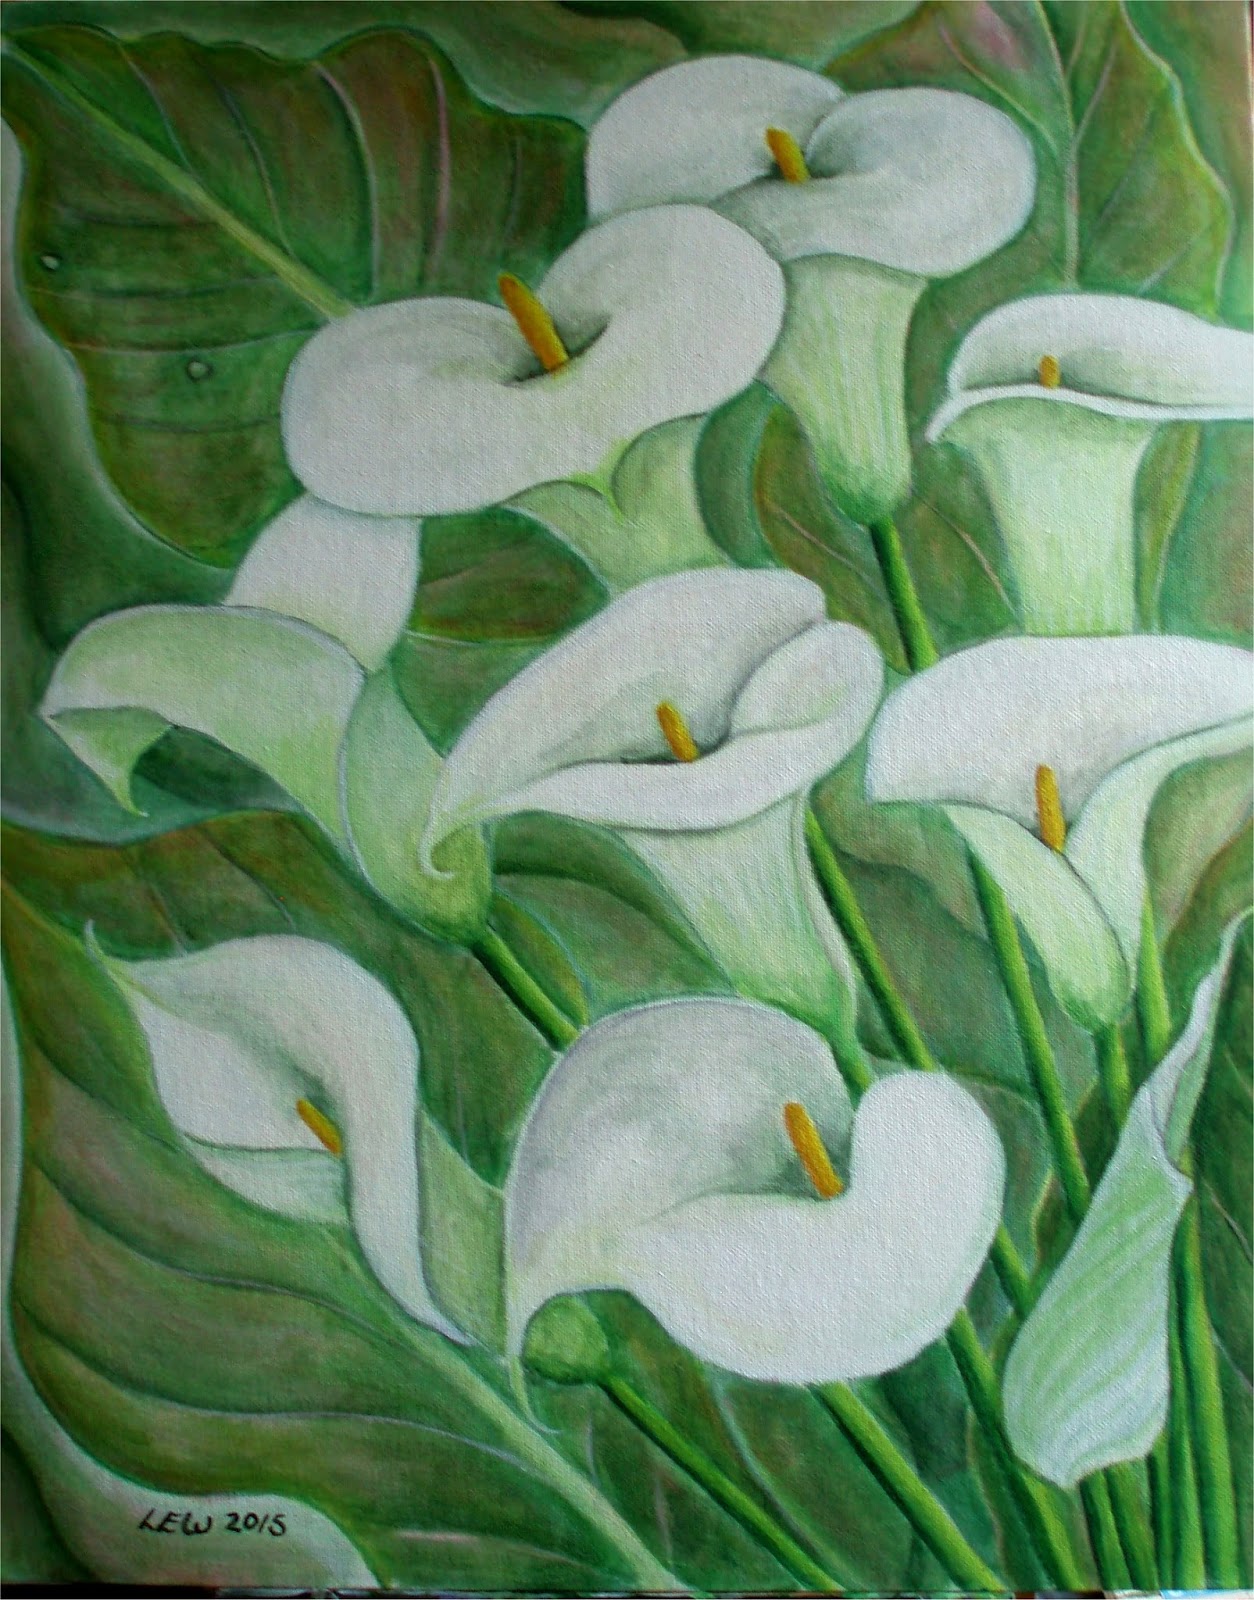
    Arum Lilies on Green/Acrylic
    This is my final piece for this term's Art Class which was influenced by the flower paintings of Georgia O'Keeffe and Tamara de Lempicka.  We have these beautiful Arum Lilies growing around our pond and it was easy to choose them as my subject.  I wanted a more subtle background compared to my red/pink practice painting and opted for pale greens.  The leaves are supposed to be more of a pattern than real leaves.  I dry brushed on some red towards the end as the painting had become too green.  I prefer this painting, the composition is better, but the jury is out as several of my colleagues at the Art class and my husband, Jeremy, liked the red version better.  If you have an opinion please let me know. 

    No more classes until September, but I hope to keep practising over the summer so do pop in.

    Lesley x

    Wednesday, 8 July 2015

    Art Class - Arum Lilies


    A zoom in on some Arum Lilies in the style of Georgia O'Keeffe/Tamara de Lempicka.   I was aiming for a simplistic style and not realism. This is a practice piece before I do my final painting for the end of term. I have used white wax crayon as a resist on the flowers and then gone over with very diluted Acrylic paint like watercolour, gradually building up the colour. The green is more vivid than the photograph shows.  The background took me longer than the flowers as I changed it's colour several times before I was happy with it. 

    Lesley x

    Wednesday, 1 July 2015

    Claritystamp Challenge - Anything goes


    With a free choice this month in the Claritystamp Challenge I thought I would use a couple of sets of stamps I had bought recently but not actually used yet. I had several attempts at this one until I came up with a design I liked.  Unfortunately I was so wrapped up in doing it I forget to take the photos for a step-by-step so hope my instructions are not too long-winded. The method was inspired by Barbara's Fabric Fields NDC 100 so if you are in the New Design Club look back at her instructions, she has photos.

    Stamps:      Hares and trees from 'In the Country' set, Filigraphy Foliage set, Laurel hedge 
    Inks:           Adirondack Butterscotch and Lettuce, Ranger Archival Jet Black
    Other:         Theuva Card, Stencil brushes, , Felt pens, Spectrum Noir pencils, Sharpie black pen


    1. Stamp the hares in archival ink onto Theuva card, cover with the mask that comes with the set.
    2. Cover all but bottom section with a copier paper mask and brush lightly with Lettuce ink then stamp the trees using the mask that comes with the set as you move along.
    3. Move onto next section leaving a white gap.  This one was brushed with Butterscotch and stamped randomly with leaves from the Filigraphy set.
    4. Moving up again brush with Lettuce and stamp with Laurel hedge.
    5. Finally the top section is brushed with Butterscotch and stamped with the trees again.
    6. Remove mask from the hares. I used fine felt pens to colour in the sections but pencils would be just as good.  If you want to use alcohol pens to colour in don't use Archival ink when you are stamping. Add shading to the hares with Spectrum Noir colouring pencils.
    7. Barbara adds some Zentangle to the white strips in her example but I quite liked it with the white so just left them.
    8. Edge with a black Sharpie pen then mount on white then silver/grey card.
    9. Brush a piece of white card with Lettuce and stamp the Laurel hedge around the edges. Colour in as before and use as final mount.
    My aim was a Zentangle look without having to draw the the shapes myself.  The colouring-in took a while but it is so relaxing it is time well spent.

    Lesley x